Repeated Data

1. Unit Objectives
In this unit we will see how to import a *.svd and *.ldf files, using one of two methods. We will also see that existing *.ldf files can be copied and used against new data.
2. Importing Sample Data Files
In this section we will import the SummarySample.svd file.
- 1. In the Work Center Manager click on Data tab, Sample Data bar.
- 2. Double-click the Company Letters project folder.
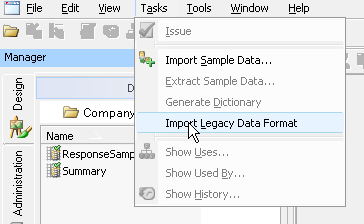
- 3. From the main menu select Tasks/ Import Sample Data.
- 4. Click SummarySample.svd.
- 5. Click Open.
- 6. Data Type, select, Keyed Records (byte measured).
- 7. Delineation, select, CR/LF Terminated.
- 8. Default Encoding Scheme, select, Host default.
- 9. Default Locale, keep default.
- 10. Default Data Handling, keep default.
- 11. Default string options, click, Trim Left and Right checkbox.
- 12. Click OK.

We need to repeat the import procedure for TransSample.svd.
- 1. From the main menu select Tasks/ Import Sample Data.
- 2. Click TransSample.svd.
- 3. Click Open.
- 4. Data Type, select, Keyed Records (byte measured).
- 5. Delineation, select, CR/LF Terminated.
- 6. Default Encoding Scheme, select, Host default.
- 7. Default Locale, keep default.
- 8. Default Data Handling, keep default.
- 9. Click OK.
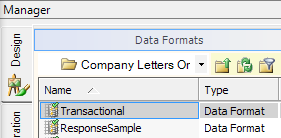
When you import a sample data file there is a Data Format automatically created for you. In this section we are going to delete the Data Format files that were created.
3. Importing Legacy Data File
In this section we will now import the legacy data definition file (*.ldf) and associate it to SummarySample.svd file.
- 1. In the Work Center Manager click on Data tab, Data Formats bar.
-
2. Double-click the Company Letters project folder.
Series 5 will now ask you to associate the Summary.ldf file with a *.svd file currently in the repository.
The data definition file has been now imported and applied to the selected sample data file.
4. Reusing a *.LDF File
In this section we will reuse the Summary.ldf using a different sample data file.
5. Associating Different Sample Data File
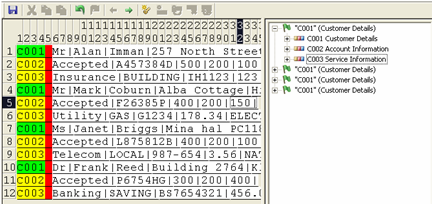
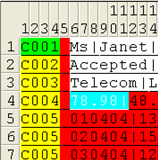
We will now associate the Transactional.ldf file with TransSample.svd. You will notice that there are two additional records, C004 and C005 that are not defined. This is the only difference between the two files.
6. Additional Record Formatting
Notice that the existing record types have now been defined. We must finish the file definition for those records and fields that have not been defined.
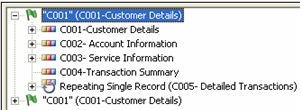
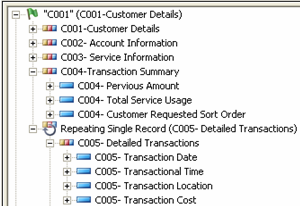
First we will define the two records C004 Transaction Summary and C005 Detailed Transactions.

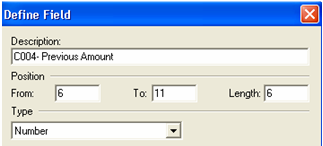
- 2. In the structure view, right-click “C004” Untitled.
- 3. Click Rename. Type, C004- Transaction Summary.
- 4. In the structure view, right-click C004- Transaction Summary.
- 5. Click Mandatory.
Lets continue with the C005 Detailed Transaction by setting it to Single Repeating.
7. Formatting Variable Length Fields
Notice that the data fields in the C004 and C005 record are not fixed in length - i.e. a given field’s length varies from record to record. We must then define these fields as variable length fields.
In this section we will format the variable length data fields for C004 Transaction Summary and C005 Detailed Transactions.
We will now set the Position relative to previous field box and the Variable size field to tell Series 5 how to treat this variable length field. We will check the first box to let Series 5 know that the initial position of these fields do not have a fixed position, i.e. their initial position may change from record to record. We will click the Variable size field box to define the character (or characters) that will tell Series 5 where the field ends.
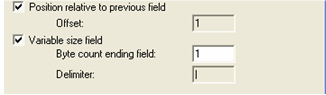
- 1. Click Position relative to previous field checkbox.
- 2. Click Variable size field checkbox.
- 3. Byte count ending field, type, 1.
- 4. Click Define.
By doing this, we are telling Series 5 that the “|” character defines the end of the field.
Now repeat this same process for the remaining fields in the C004 and C005 records.
Position relative to previous field and Variable size field checkboxes will both be checked in all definitions.
Position relative to previous field and Variable size field checkboxes will both be checked in all definitions. Offset will always be zero.
We need to issue the Transactional Data Format file. This allows us to use the Generate Dictionary Wizard that will be used in the next section.
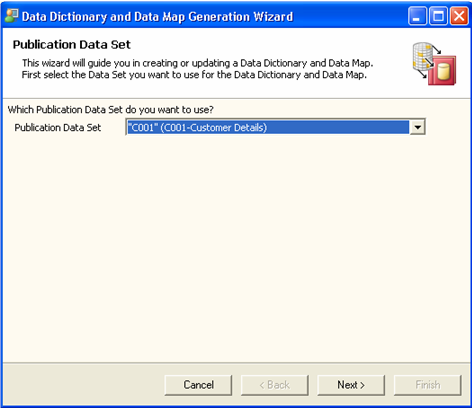
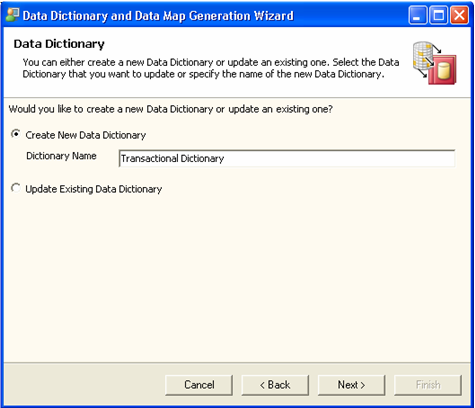
8. Automatically Generate Data Dictionary and Map
There are a few ways of creating the data dictionary and map. In this section we are going use the Wizard to create the data dictionary and map for the Transactional Statement. We will create the data map for Summary Statement using the Production Wizard and the dictionary in later units.

9. Issuing Data Map
When using version 5.5 and an automatically generated Data Map we no longer have to issue our Transactional Data Map. The system automatically issues it for us.