Transactional Table
1. Unit Objectives
In this unit we will show you many aspects of Series 5 that should make your application building easier. We will show you how to use a look-up table to enable you to do text substitution during the time the document is created. System variables will be discussed - data that can be placed on the page and is created by Series 5. You will also see how to concatenate several strings into one and create complex formulas, using many functions, among which can be arithmetic operators. We will also show you how to present repeating data in a clear way on your bill using a transaction table.
2. Duplicating a Publication
In this section we will duplicate the Offer Letter and reuse it for the Transactional Statement.
- 1. In the Work Center Manager click on Design tab, Publications bar.
- 2. Double-click the Company Letters project folder.
- 3. Select Offer Letter publication.
- 4. From the main menu select Edit/ Copy.
- 5. From the main menu select Edit/ Paste.
- 6. Right-click the Copy of Offer Letter.
- 7. Select Rename.
- 8. Type, Transactional Statement.
- 9. Press Enter.
- 10. Double-click Transactional Statement.
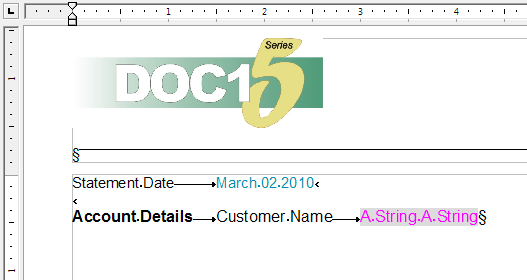
3. System Variable- Date
In this section we will be creating a system variable for generate date.

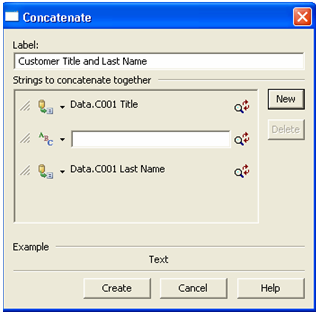
4. Concatenation
In this section we will concatenate the customer name by placing the title and last name.
- 1. From the main menu select Insert/ Field/ Concatenation.
- 2. Label, type, Customer Title and Last Name.
- 3. Click the New button.
- 4. Click
 .
. - 5. Select Data Field.
- 6. Use the drop down and select the Transactional Dictionary.
- 7. Select C001- Title.
- 8. Click OK.
Since we are trimming all extra spaces, we need to add a space to separate the data fields.

5. Arithmetic- Subtraction Function
An arithmetic function performs a calculation on two input values and outputs the result.
- 1. Press Shift + Enter 2 times.
- 2. Set the font to Arial, 12, Bold.
- 3. Type, Statement Summary:
- 4. Press Tab.
- 5. Set the font to Arial, 12, Regular.
- 6. Type, Previous Amount.
- 7. Press Tab.
In this section we will subtract the C002 Service 2 Opening Balance from the C002 Service 3 Opening Balance to calculate our Previous Balance.
- 1. From the main menu select Insert/ Field/ Arithmetic.
- 2. Label, type, Previous Balance.
- 3. Click
.- 4. Select Data Field.
- 5. From the Transactional Dictionary, select, C002 Service 3 Opening Balance.
-
6. Highlight, - ( Minus).
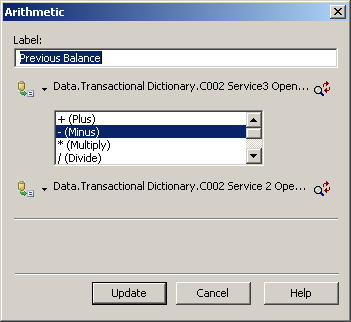
- 8. Select Data Field.
- 9. From the Transactional Dictionary, select, C002 Service 2 Opening Balance.
- 10. Click Create.
We are going to add some additional formatting to the Previous Balance.
- 1. Highlight the field Previous Balance and right-click.
- 2. Select Format.
- 3. Click the Format icon

6. Formula Expression
Formulas can be used as part of some design objects to specify more complex parameters than can be provided by simple value controls or as a more convenient way of coding compound functions.
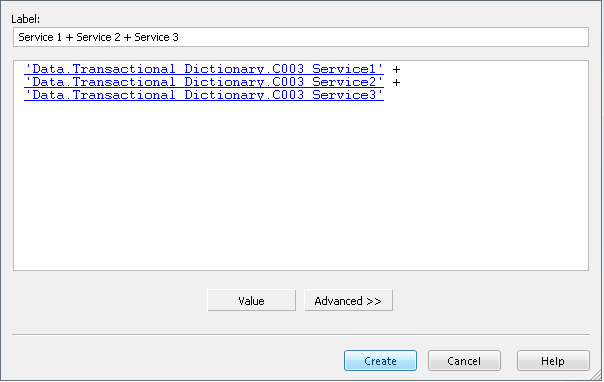
We are going to create a formula express to calculate our Service Balance.
In this section we will create a variable that will hold the results of our Service Balance.
- 1. In the logic map, mark your insertion point at Section <Insert object here>.
-
2. From the main menu select Insert/ Set Variable.

Click the Advanced button and note all the options available. Click the Simple button when you are done.
- 7. Select Data Field.
- 8. From the Transactional Dictionary, select, C003 Service 1 Current Balance.
- 9. Click OK, Update+.
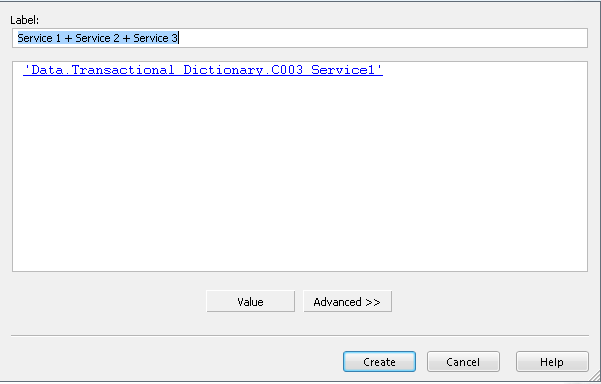
- 10. Type + then hit enter
- 11. Repeat the same process for the following:
- C003 Service 2 Current Balance
- C003 Service 3 Current Balance
- 12. Click Create.
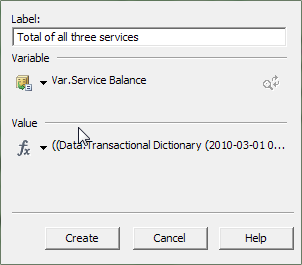
We are going to place the variable we just created.
- 1. In the document, click after Service Balance.
- 2. From the main menu select Insert/ Field/ Variable.
- 3. Select Service Balance.
- 4. Click Create.
This time we won’t need for do any additional formatting to the Service Balance because we have cast the amounts to be currency by placing them in a variable with the value of currency.
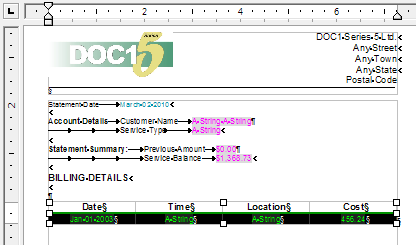
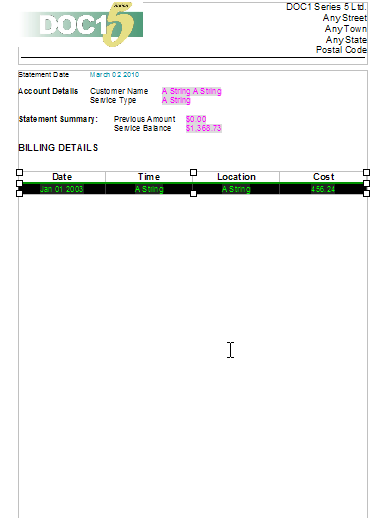
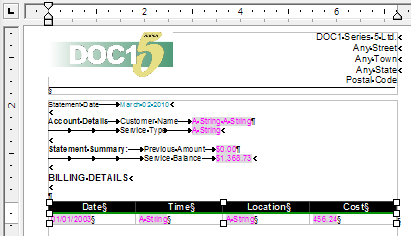
7. Transactional Table
Transactional tables allow us to place the data in repeated records on the page, automatically spacing each line of data.
In this section we are going to create a table that lists the dates, time, location, and costs of phone calls.
- 1. Press Shift + Enter 2 times.
- 1. Set the font to Arial, 14, Bold.
- 1. Type, BILLING DETAILS.
- 1. Set the font to Arial, 12, Regular.
- 1. Press Shift + Enter 2 times.
We are going to use the Table Wizard to create the Table.
- 1. From the main menu select Table/ Table Wizard.
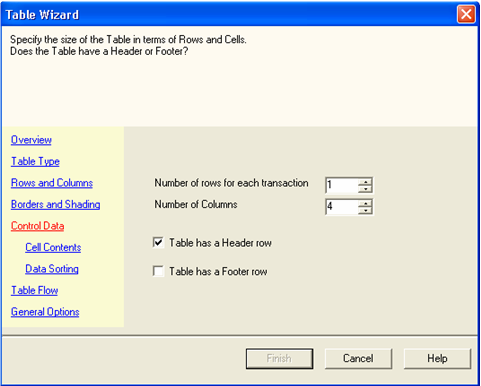
- 2. On the far left side of the window, click Table Type.
- 3. Click the, Transaction Table radio button.
- 4. On the far left side of the window, click Rows and Columns.
-
5. Set Row to 1.
Set Columns to 4. -
6. Click Table has a Header row checkbox.
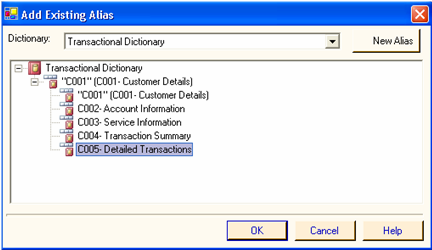
In this section we will associate the repeated data record that will provide the information for the transaction table.
- 1. On the far left side of the window, click Control Data.
- 2. Click Select.
- 3. From the Transactional Dictionary, select, C005- Detailed Transactions.
-
4. Click OK.
Next we are going to place the appropriate repeated data field in the correct cells.
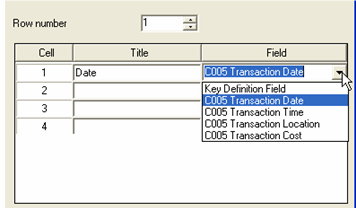
- 3. From the drop down menu select C005 Transaction Date.
- 4. Repeat the same process for the following:

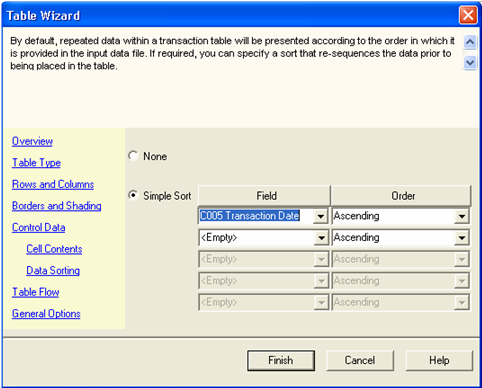
We are going to sort the C005 Transaction Date field prior to it being placed in our table. In this section we are going set it to be placed in ascending order.
- 1. On the far left side of the window, click Data Sorting.
- 2. Click the, Simple Sort radio button.
- 3. From the Field drop down menu select C005 Transaction Date.
- 4. From the Order drop down menu select Ascending.
-
5. Click Finish.
8. Modifying Table
In this section we are going to add borders, set header fonts/ alignment and change the date format.
- 1. Highlight the first row.
- 2. From the main menu select Table/ Properties/ Row.
-
3. Click the Style tab.
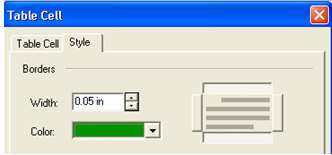
- 4. Click on the bottom and top edge of the border palette.
- 5. Borders, Width, 0.05 in.
- 6. Color, select, Dark Green.
- 7. Click OK.

We are going to continue formatting by bolding and centering the header.
- 1. Hightlight the cell in the first column, second row and right click.
- 2. Select Format.
- 3. Click the Format icon
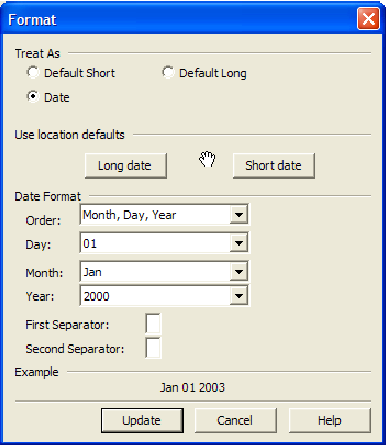
- 5. Click, Date radio button.
-
6. Date Format:
Order, select, Month, Day, Year.
Day, select 01.
Month, select, Jan.
Year, select 2000.
First Separator, type, Space.
Second Separator, type, Space. - 7. Click Update.
- 8. Click Update.